For printing projects to be taken to that next level, an LED UV printing press is one major way that can help enhance any type of work to its deserved potential. Using the LED UV method does have many benefits, but exactly how does this system work? Read on to find out the ins and outs of an LED UV printing system.
What An LED UV Printing Press Looks Like
An LED UV printing machine isn't like your ordinary printer that you'll find sitting in the corner of the office. Essentially, what sets this printer apart from the competition is its unique UV curing technology and it allows you to print directly onto numerous different materials, in record speed with incredible detail.
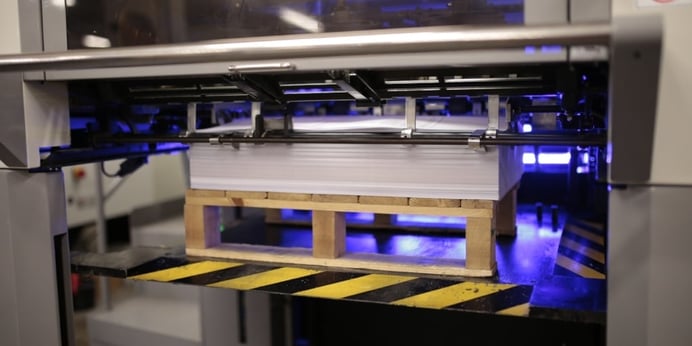
Before we can go into depth on how UV curing works inside of an LED UV printer, let's take a look at what your typical LED UV printing system looks like. As you can see, plenty of space is needed to accommodate this cutting-edge piece of technology.
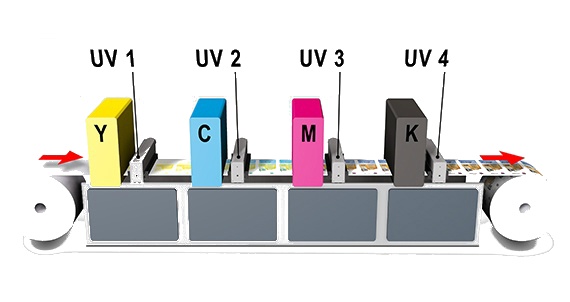 Image Credit: GEWUV
Obviously, not every machine is going to look the same. Different companies will create ones that look different than others but at the end of the day, the systems with the best technology implemented will obviously produce the better results.
Let's break this down further and see the role each section or compartment plays.
The Process
Feed through a blank substrate

The first part of the process is where you start with a blank substrate. This can be pretty much any stock of your choosing from silk paper to uncoated stock.
This either comes in a roll (as you can see above) or it can come as a stack of cut sheets. Once this has been finalised, the paper is then fed through the first compartment and the process of applying ink officially begins.
first set of colours and inks are applied and cured
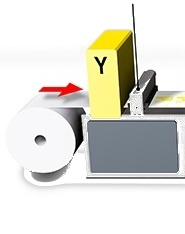
As the substrate begins feeding through the press, each compartment of the system applies colour to the image on top of each other to complete the image.
When one colour is printed, the inks need to be cured before the next colour is applied in the following compartments. If the ink isn't dried, then the whole project will be ruined.
If we follow the process from the image above, the yellow section is adding the inks while the small compartment next to it is curing the inks and adhesives - but we'll get on to the UV curing method in a little while.
Once cured, the process continues.
The exact process continues: apply ink and cure
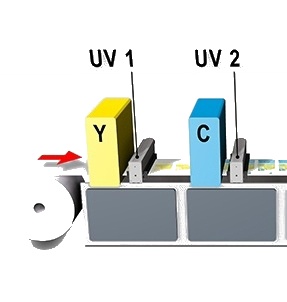
As you can see, the entire process pretty much repeats itself.
Once the first colour has been applied, the substrate continues feeding through once it's been cured before another colour has been applied.
Following the diagram above, once the first set of inks have been cured, it will go through a second compartment which prints more colours before the inks are cured again.
...and again
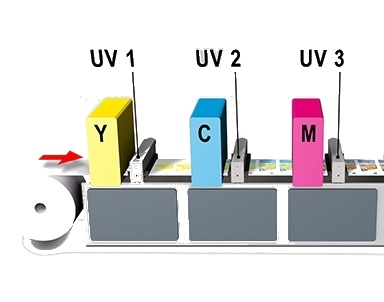
Once again, once the second set of colour has been printed and the ink has been cured, the substrate continues feeding through the LED UV printing system.
As you can see in the diagram above, the third step remains exactly the same as you come towards the end result. Once cured, the sheet continues feeding through so that more colour can be applied and cured so that it doesn't get ruined, bleeds or anything else that will compromise the overall quality.
final colours and inks are applied and cured
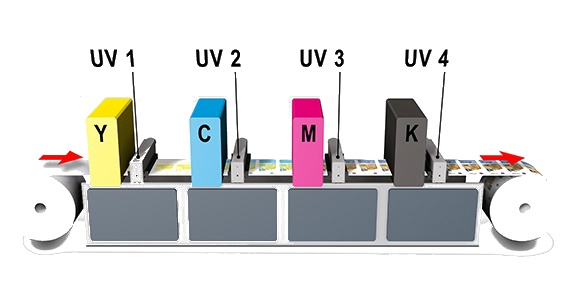
Eventually, the substrate will continue feeding through towards the final compartment situated in the LED UV printing machine.
Again, the same thing happens as inks and colours are applied before the final curing is applied. Once that has been completed, you'll have your amazing piece of work ready on the plate in all its glory. The image above shows how the press prints and dries one colour at a time to form a complete image at the end.
But now that you know what goes on inside of an advanced LED UV printer and what happens at each stage, it's important to know the vital aspects of what actually takes place in the curing stages which help achieve the high quality that's chased.
How UV Curing Works In An LED UV Machine
Without getting into a scientific explanation - which you can read here anyway - UV curing basically uses light instead of heat to dry the inks and adhesives.
The liquid monomers and oligomers are mixed with photoinitiators in such quick time before they are exposed to UV energy. The diagram below explains it much simpler and in a matter of seconds, the inks, coatings and adhesives instantly harden and your image is cured.
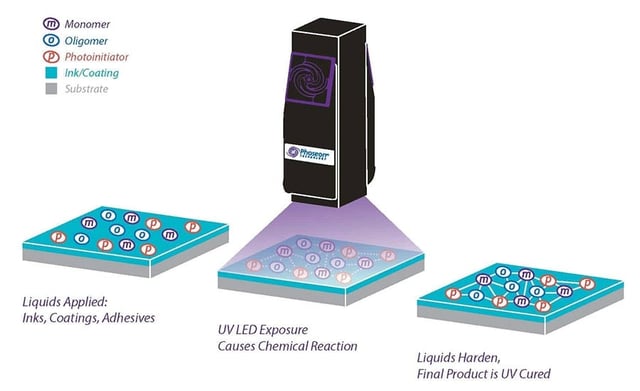 Image Credit: Adhesives Mag
This process is a better alternative to the solvent-based products. This is because the conventional heat and air-drying method worked by evaporating the solvents. This made coatings shrink by more than half while also creating environmental pollutants.
In UV curing, there's never any solvent to evaporate in the first place, so there's no loss of coating thickness, no environmental pollutants and no loss of volume. As you can tell, this method dramatically improves physical properties because of this unique drying method.
For any business looking for the best quality, it's good to know exactly what you're getting if LED UV is chosen and the role the technology plays in achieving the highest quality possible.
We've Explained The Ins And Outs Of LED UV, Now Put This Knowledge Into Action
Every business will want the best quality possible, along with the luxury of having quick turnaround times. While searching for the perfect print technology is important, it's not the only aspect you need to consider when crafting your own project - such as a luxury brochure.
In this blog post, we've explained the important bits of information you need to know about an LED UV machine and how it works. But for even more tips and advice on how to create a luxury brochure of your own, download our free guide below. Or if you want to find out about other types of print, we have a guide for that too.
